
PACKING LIGHT
Packing for your cycling holiday or bike tour may not be the most exciting part of the planning, however it might be the make or break of a really successful trip. There’s an art to ensuring you have exactly what you do need but not too much more. Getting caught without some of the essentials and being overloaded with gear over long distances are two scenario’s that can, and should, be avoided.
If you’re carrying your gear on the bike we recommend packing only the essentials and picking up anything else you need along the way. Our routes pass through towns and cities so you won’t be far from food, water and supplies for too long. To make sure you get the balance right follow our guide and don’t forget to check the weather.
HOW TO PACK FOR A CYCLING TOUR?
Touring by bike involves long days in the saddle, so getting comfortable and being well balanced with all your gear on the bike is paramount. It’s therefore important to consider your main touch points; handlebars, saddle and pedals, as well as where you’ll mount your bags.
ADAPTING YOUR BIKE FOR LONG DISTANCES
Over long distances maintaining a regular pace takes precedence over achieving high speeds so raising your handlebars slightly can help establish a more comfortable, upright position and raises your centre of gravity.
Being able to vary your grip will also help relieve muscle aches, so fit bar ends onto straight handlebars and some cyclists even recommend tri-bars to give you more options, and allow your arms and body to shift position.
When choosing a saddle, look into those made specifically for cycle touring. A stripped down, ultra-lightweight carbon model may be the best choice for breaking your weekend personal-bests, but will it work well for you over several hours on multi-day rides?
THE GOLDEN RULES OF PACKING LIGHT
When it comes to deciding what to take and, just as importantly, what not to take, start by pulling together the items you consider to be absolutely essential. you’ll soon realise how quickly it all adds up and may need to cut your list in half.
You want to be as light as possible without leaving important items out, a few simple rules will get you started.
Above all else, you will need to hydrate, hydrate, hydrate. This is one place you can’t cut corners. Plan for at least two large bottles, mounted within easy reach, which can be topped up regularly.
Be ruthless with the number of changes of clothing you carry, some items need to be fresh each day while others can be reused or laundered.
Roll, don’t fold, when packing clothes. This saves space and reduces creasing so you can get dressed straight out of the bag.
Don’t overfill your bags, always allow some extra space for items you’ll need to pick up along the ride.
Last things first; items you need to access quickly on the road should be at the top and everything else further in.
Check the weather a week in advance and the day before. pack for the conditions you’ll be riding in, don’t get caught out.
Go digital with books, GPX routes, maps, notes and lists, they can all be organised on your phone. Don’t forget your charger and power adapter, and share important documents so they are saved on multiple devices.
Keep your wallet and passport close to hand, if all else fails they will be your get out of jail card.

ESSENTIALS ON THE BIKE
Using a helmet is highly recommended, the more time on the road the more likely an accident will be, even if it’s a minor fall. We’re not trying to dissuade you from setting off, however it’s a fact of life that we need to acknowledge. In many countries helmet’s are required by law, so whether you like it or not, take one with you.
The next most important choice are your cycling shorts. Fitted correctly, and with a generous application of lubricating chamois cream, padded shorts (no underwear) will keep you in the saddle longer. A certain amount of irritation is to be expected from the thousands of revolutions you will put through your pedals, however avoiding serious chafing is crucial. In the worst cases friction cuts and rashes could end your ride long before the finish line. Pack at least two pairs of shorts, this is one item you’ll want to keep as fresh as possible.
Your shoes must be well cushioned and breathable. you’ll be demanding a lot from your feet on and off the bike so take good care of them. Good quality cycling or sports socks that wick the sweat away from your skin are also worth the investment and may spare you some nasty blisters.
Likewise, gloves, or fingerless mitts for summer, with padded palms will absorb a lot of the wear over long successive days on the road and will play a surprisingly important role in keeping you on track. Even if you’re not used to wearing gloves, give them a try.
As a rule of thumb, a change of jersey or top every other day is generally acceptable. It’s nice to have a fresh one every morning however they will absorb a lot of space if you’re traveling for more than three or fours days. Remember, if you are planning rest days this will also be your chance to clean laundry.
Additional items depend on where you’re heading and at what time of year. wherever that might be, it’s worth assuming that conditions may change, especially if you’re spending time at an altitude of more than a few hundred metres above sea level. the higher you are the quicker the weather can turn. wet weather gear should never be left out, a pack-away rain-proof jacket will also provide some protection from wind and cold if needed.

ESSENTIALS OFF THE BIKE
You’ll need some easy, clean clothes for your time off the bike, so make practical choices in favor of items which are multi-purpose and transition well from day to evening. You can rule out smart clothes for fancy restaurants however think comfortable, smart and casual to keep your dining choices more open.
A t-shirt, lightweight sweater and trousers plus sneakers, or flip flops for summer, should cover most instances. a beanie hat may also be useful for colder evenings and won’t take up much extra space.
“I would rather own a little and see the world than own the world and see a little of it. ”
BIKE MAINTENANCE
Guessing how much to carry for repairs is always a gamble. Covering yourself for every eventuality will add a lot of weight, and some bulk, however taking too little could leave you stranded with a long walk to the nearest town.
This decision somewhat depends on where you will be traveling. Our rides regularly pass through towns large enough to have a bike shop, however if you’re planning to cross deserts or extensive mountain ranges you may need to be more self-sufficient.
Prioritise the essentials; a multi-tool, inner tubes and pump, tyre leavers, puncture repair kit, a few chain links and brake cables. the most important tools of all are some local currency in cash and a fully charged phone, as they will get you out of all sorts of difficult places.
REFUELING ON THE RIDE
Taking full advantage of the local food is one of the great perks of spending all day burning calories. You have the perfect justification for eating far more than an average day at home and indulge in sweets and carbs that may not ordinarily meet your dieticians approval.
If you have specific dietary or medical requirements you’ll need to consider a few days supply, again depending on where you’re traveling and the likely availability. this aside, you won’t want to carry too much beyond energy gels, power bars, dried fruit and sugary sweets such as jelly babies. Camping may also demand that you carry other essentials however it’s always preferable to carry less, visit markets daily and buy what you need on route.
ALL WRAPPED UP
The key factors, that will define your choices, will be the number of days on the road, weather conditions, access to food and water, and facilities available at the hotels or campsites you visit.
You’ll find an essentials packing list of items you should carry for summer and winter cycle tours in all our epic cycle guides with the estimated volume of bag size needed. The rest is down to your personal preferences.
Trial and error is often the best lesson and, accept from the outset, on most trips it’s inevitable you’ll carry an unused item or two and leave out something you later wish you had packed. It’s all part of the ride!


BIKE BAGS WE LIKE
On long distance cycle tours we like to keep the load off our backs and on the bike to stay cool and free to move. It’s important to distribute the weight of your gear to maintain balance and stability. Here we look at the pro’s and con’s of the three main options; saddle, handlebar and frame bags.
SADDLE BAGS
A good starting point, it’s possible to fit all you need for a few days cycling into a saddle bag. Newer designs don’t need pannier racks which saves weight and makes fitting simpler. larger styles which hold more weight can affect the balance of your bike so get used to the way it feels fully loaded before heading off on longer rides. We like Apidura’s Expedition Saddle Pack.
BAR BAGS
A useful option for shorter trips or as an addition to a saddle or frame bag. allows quick, easy access to essential items while on the bike and a more secure location to store money & passports in view. Placing weight at the front of the bike changes the feel of your steering. Make sure you have sufficient space either side if attaching to drop handlebars. We like Rapha’s bar bag.
FRAME BAGS
Provide significant extra storage for longer cycling tours however the best designs remain slim to avoid contact with your legs. Available in many sizes, if choosing larger options which fill most or all of the frame, consider alternative places to carry your essential water bottles which can still be easily accessed while cycling. We like Restrap’s Frame Bag.

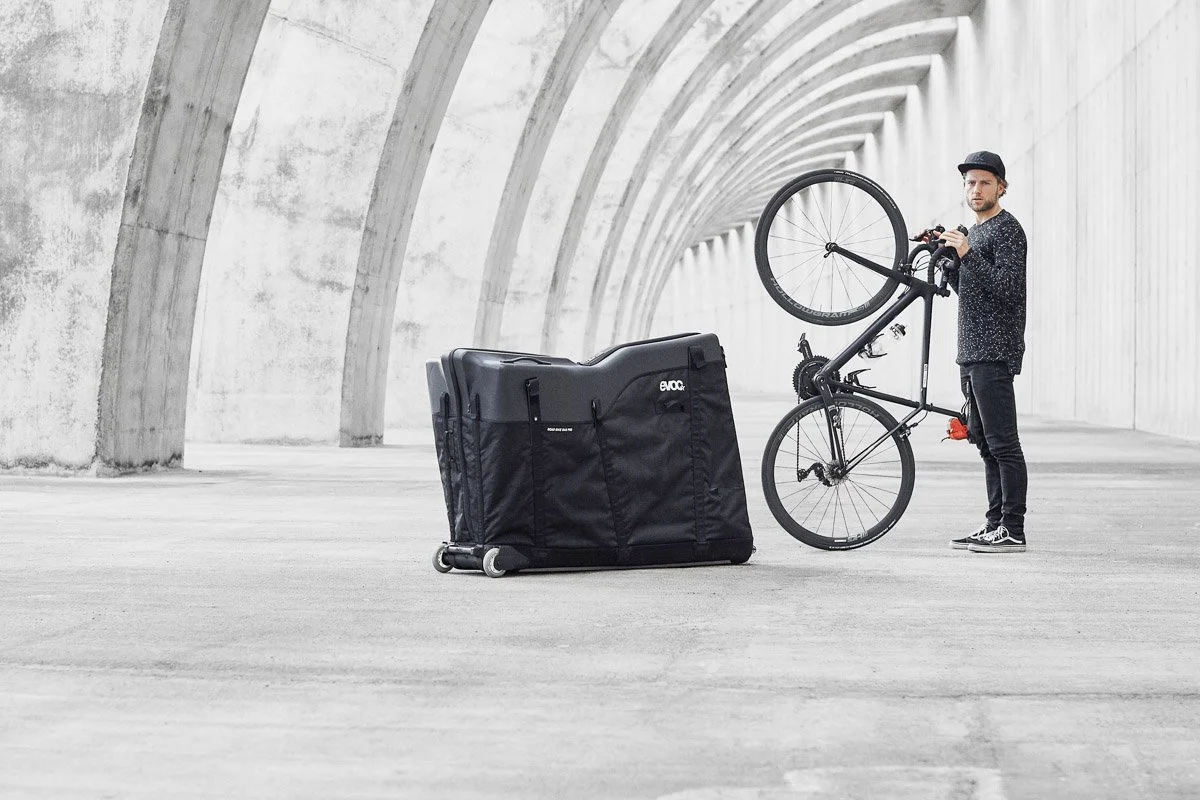
TRAVELING WITH YOUR BIKE
If you’re planning to stay in one location and ride the local loops then traveling light and hiring a bike on arrival is a good option. However, this depends on the quality of the cycle shops in the area and many cyclists prefer to take their own equipment set up to their own specification.
When following one of our epic route guides you’ll be riding from one place to another which makes returning hire bikes much less convenient. So how to travel with your own bike and keep it in good working condition? There are two main options; a solid box or a soft bag, with some good hybrid options in between. Both options have their pros and cons which we look at here.
SOFT BAGS
The lighter and less bulky space saving option can reduce charges at flight check-in and fits into regular cars & taxis more easily which may also save some costs. Crucially, as they pack down to a much smaller size once the bike and equipment has been removed, you wont have too much excess luggage hanging around in the car or in hotel storage.
Soft bags don’t however offer full protection against knocks and bumps from careless handling so there is always the risk of damage on route. Better bike bags include internal structure to support the bike and padding to upgrade the level of protection.
HARD CASES
A solid flight case by contrast will take the knocks much better than a soft bag construction. A dented bike box won’t stop you hitting the road whereas a damaged bike starts with a search for a trusted local repair or hire shop. Despite the extra size and weight bike boxes can be easier to move around as many have built in wheels for navigating airports.
Increased protection generally comes with a higher price tag. Depending on the model it may also require more weight allowance on the flight and space to transport on arrival which could require a mini-van rather than a car, incurring additional costs.


HOW TO PACK A BIKE?
every bag and bike requires a slightly different approach, especially if there is a built-in stand to secure the bike and additional padding to protect it. however there are a few basics which most designs have in common.
1. WHEELS
First of all remove both wheels using the quick releases or with the correct size of spanner. Most bags and cases comes with wheel covers or pockets to keep them apart and prevent them from scratching the bike frame.
2. SEAT POST
Remove the seat post using an allen key or quick release. Some bag brands recommend dropping it into the frame however this can scratch the paintwork and is often better packed separately. If you have a built in seat post be careful to select a bag large enough to accommodate your frame.
3. HANDLE BARS
The handle bars will need to be turned side ways to align with the frame to save space. This is usually a straight forward operation using an allen key to loosen the stem bolts which can easily be reassembled at the other end.
4. GEARS
Some bags require the rear derailleur and the front chain set to be removed as they are exposed to damage without the wheels in place. This requires a few more skills than the other stages so plan in advance and where necessary consult your local bike shop so you can reassemble on arrival.

SHIPPING YOUR GEAR?
When following one of our epic cycle rides you’ll be traveling long distances from one place to another and seeing a lot of your amazing host country. So what to do with the bags, cases and gear you don’t want to carry on the bike?
Friends who can drive along the route and meet you at intervals are always a welcome addition to the crew, however if you’re cycling solo or if everyone is on the ride then using a reliable shipper to deliver your gear is a tried and tested solution.
We recommend Shiply to compare quotes from customer rated couriers who can pick up your luggage and deliver to your destination. keep in mind that if you’re not shipping to a private address, always check your hotel or residence can receive your belongings with or without you present.